Server backup using OpenSource Bareos

Server backup

Having an up-to-date backup copy for any user (especially a business) is extremely important since no one is immune from unpleasant events associated with media failure, loss of information, accidental deletion, etc. In such situations, a backup becomes the only way to restore your priceless data, and therefore it can save you a lot of trouble, wasted time, damaged nerves, and wasted money.

We chose the popular Bareos software as our backup system because it:

  • is an OpenSource solution;
  • actively developing;
  • has many useful features;
  • can expand its functionality with plugins.

Task Description

For example, let's take three servers: Bareos, BitrixVM, and Windows Server 2012 R2. In our case, they are all within the same network; at the same time, Bareos allows you to perform backups even when the machine is offline.

Bareos - 172.16.10.10 BitrixVM - 172.16.10.11 Windows Server - 172.16.10.12

For a server with Bareos, we will use CentOS 7. The usual installation takes place:

# yum install -y bareos-client bareos-database-tools bareos-filedaemon bareos-database-mysql bareos bareos-bconsole bareos-database-common bareos-storage bareos-director bareos-common

PostgreSQL will be used as the database. Installation is just as easy:

# yum install -y PostgreSQL-server postgresql-contrib

When installing Bareos in /etc/bareos, we have the following list of files and folders (with the exception of the ssl directory, we will move on to it a little later):

/bareos-dir.d
/bareos-sd.d
/ssl
bareos-dir.conf
bareos-fd.conf
bareos-sd.conf
bconsole.conf
.rndpwd

After installation, prepared scripts for working with Bareos will appear in the /usr/lib/bareos/scripts/ directory. Using them, let's pre-configure the database (create the database, tables, and permissions):

su postgres -c /usr/lib/bareos/scripts/create_bareos_database
su postgres -c /usr/lib/bareos/scripts/make_bareos_tables
su postgres -c /usr/lib/bareos/scripts/grant_bareos_privileges

An important nuance: the names of our machines must be resolved; if not, then add the appropriate lines to /etc/hosts:

172.16.10.10 bareos-server
172.16.10.10 bareos-fd
172.16.10.11 bitrixvm
172.16.10.12 win-fd

bareos-server - the server itself, bareos-fd - we will also make a backup of the server itself, i.e. at the same time, it will act as a client, later in the configuration, it will be visible, bitrixvm is a client with BitrixVM, win-fd is a client with Windows Server 2012 R2.

The server part for Bareos (namely, the director) must be configured in the bareos-dir.conf file. The director is responsible for all operations performed.

Main directives:

**Director** — description of the director himself;
**Storage** - the device on which we write backups;
**Catalog** - contains information on completed Jobs, saved files, clients, and statuses;
**Messages** - what messages will be collected and how to deliver them;
**Console** - setting up the console for managing the director;
**Client** — description of the client from which the backups will be taken;
**Pool** - allows you to manage the Volume where data will be written for different types of backup (Full, Incremental, Differential), limit the storage period of the Volume, sizes;
**FileSet** - we determine what data is to be backed up, and additional attributes;
Schedule - schedule;
**Job** - Description of the backup task.

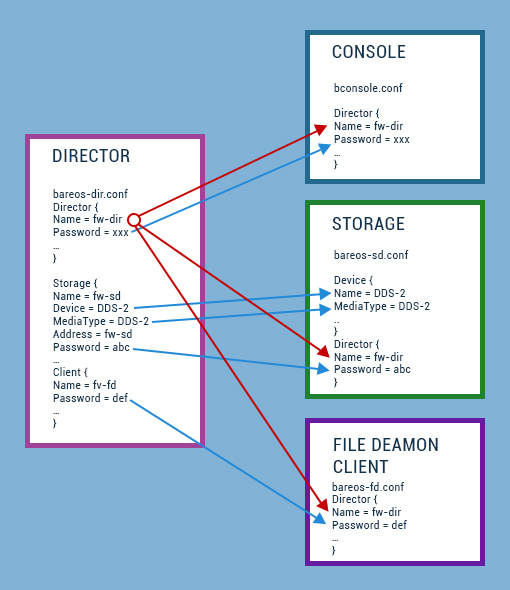
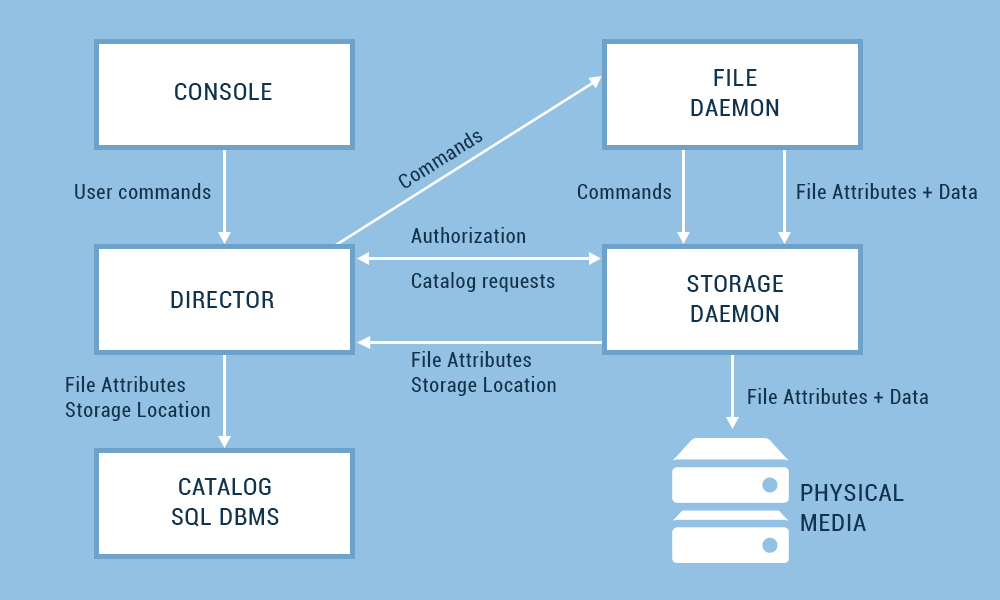
The scheme of interaction between services looks like this (from the official Bareos documentation): Server backup

Contents of the bareos-dir.conf file:

Director {
#Required parameter director's name
Name = bareos-server
# Required parameter for request files
QueryFile="/usr/lib/bareos/scripts/query.sql"
# Number of simultaneously executed Jobs
Maximum Concurrent Jobs = 10
# Password (usually 20-40 characters are used, for the test, we will limit ourselves to 9 characters)
Password = "zcx@#$BGj"
# Specifying which notifications to use (the Message directive is described below)
Messages = standard
# TLS encryption. Will be described next.
# TLS enabled
TLS Enable=yes
TLS Require = yes

TLS Verify Peer = yes
#Allowed CNs
TLS Allowed CN="bareos-server"
TLS Allowed CN="bitrixvm"
TLS Allowed CN="win-fd"
# Location of the CA certificate
TLS CA Certificate File = /etc/bareos/ssl/ca-chain.cert.pem
# certificate location
TLS Certificate = /etc/bareos/ssl/bareos-server.cert.pem
# Location of the key to the certificate
TLS Key = /etc/bareos/ssl/bareos-server.nopass.key.pem
TLS DH File = /etc/bareos/ssl/dh1024.pem
}

Storage {
Name=bareos-server-sd
# You can specify both by IP and by name, for TLS to work correctly, it is important to specify by #name
Address = bareos-server
Password = "zcx@#$BGj"
# Specifies a name for the device where the data will be stored. Device options are set in the bareos-sd.conf file
Device=bareos-sd
Media Type = File
port=9103
TLS Enable=yes
TLS Require = yes
TLS CA Certificate File = /etc/bareos/ssl/ca-chain.cert.pem
TLS Certificate = /etc/bareos/ssl/bareos-server.cert.pem
TLS Key = /etc/bareos/ssl/bareos-server.nopass.key.pem
}

Catalog {
#Set all parameters for connecting to the database
Name = bareos-server
dbdriver="postgresql"
dbname="bareos"
dbuser="bareos"
dbpassword=""
}

messages {
# Describes the types of messages that should be sent and logged
Name = Standard
mail = root@localhost = all, !skipped, !audit
console = all, !skipped, !saved, !audit
append = "/var/log/bareos/bareos.log" = all, !skipped, !audit
append = "/var/log/bareos/bareos-audit.log" = audit
}

client {
# Client name for backup
Name=bareos-fd
# Directory name
Catalog = bareos-server
enabled = yes
# Address set by name
Address = bareos-server
Password = "zcx@#$BGj"
port=9102
# TLS parameters will be described later
TLS Enable=yes
TLS Require = yes
TLS CA Certificate File = /etc/bareos/ssl/ca-chain.cert.pem
TLS Certificate = /etc/bareos/ssl/bareos-server.cert.pem
TLS Key = /etc/bareos/ssl/bareos-server.nopass.key.pem
}

Pool {
# Pool name for full backup
Name = bareos-pool -Full
# Automatically adds a label like "bareos-client-Full-" + number #Volume to the backup file
#For example, the final name of Volume after the next backup will look like bareos-client-# Full-0009
Label Format="bareos-client-Full-"
# Pool type. According to the official documentation of BareOS, only the Backup type is currently implemented
Pool Type = Backup
# Volume for a full backup is stored for 3 months
Volume Retention = 3 months
# after which the directory is cleared of obsolete data
AutoPrune = yes
# Volume is overwritten
Recycle = yes
}

Pool {
# Pool name for incremental backup
Name = bareos-pool-incremental
Pool Type = Backup
Recycle = yes
Auto Prune = yes
Volume Retention = 10 days
Label Format="bareos-client-Incremental-"
}

Pool {
# Pool name for differential backup
Name=bareos-pool-Differential
Pool Type = Backup
Recycle = yes
Auto Prune = yes
Volume Retention = 11 days
Label Format="bareos-client-Differential-"
}

FileSet {
# Set a name for a set of files
Name=bareos-fileset
# In Include, we specify which files will be saved. In this case, the /etc folder
include {
File="/etc"
}
}

Schedule {
#Schedule name
Name="MonthlyCycle"
# Perform a full backup once a week
Run = Level = Full mon at 2:00
# During the day 5 incremental backups every hour
Run = Level= Incremental hourly at 13:00
Run = Level = Incremental hourly at 14:00
Run = Level = Incremental hourly at 15:00
Run = Level = Incremental hourly at 16:00
Run = Level = Incremental hourly at 17:00
}

job {
# Name for the task
Name = Job-Full
# Its type. Can be Backup or Restore
Type = Backup
# Backup level. Full, Differential or Incremental
Level = Incremental
# For which client the Job is being executed
Client=bareos-fd
# Set of files
FileSet = bareos-fileset
# Schedule
Schedule = "Monthly Cycle"
# Name of Storage used
Storage=bareos-server-sd
# Alerts
Messages = standard
# Used pool
Pool = bareos-pool-Full
Full Backup Pool = bareos-pool -Full
Differential Backup Pool = bareos-pool-Differential
Incremental Backup Pool = bareos-pool-Incremental
}

job {
Name = Job-Full-restore
Type = Restore
Client=bareos-fd
FileSet="bareos-fileset"
Storage=bareos-server-sd
Pool = bareos-pool-Full
Messages = standard
# Specify the path where all the files will go when restoring
Where=/tmp
}
# Add as separate configuration files for the other two clients.
@/etc/bareos/bareos-dir.d/win.conf
@/etc/bareos/bareos-dir.d/bitrixvm.conf

It is important that there is a correspondence between the configurations: Server backup

Next, configure Storage in bareos-sd.conf:

Storage {
# Name
Name=bareos-server-sd
# Maximum number of simultaneously executing Jobs
Maximum Concurrent Jobs = 20
# Address, specify by name
SDAddress = bareos-server
SDPort = 9103
TLS Enable=yes
TLS Require = yes
TLS Verify Peer = no
TLS Allowed CN="bareos-server"
TLS CA Certificate File = /etc/bareos/ssl/ca-chain.cert.pem
TLS Certificate = /etc/bareos/ssl/bareos-server.cert.pem
TLS Key = /etc/bareos/ssl/bareos-server.nopass.key.pem
}

Director {
# Describe the parameters of the director that can connect to Storage
Name = bareos-server
Password = "zcx@#$BGj"
TLS Enable=yes
TLS Require = yes
TLS Verify Peer = yes
TLS Allowed CN="bareos-server"
TLS CA Certificate File = /etc/bareos/ssl/ca-chain.cert.pem
TLS Certificate = /etc/bareos/ssl/bareos-server.cert.pem
TLS Key = /etc/bareos/ssl/bareos-server.nopass.key.pem
TLS DH File = /etc/bareos/ssl/dh1024.pem
}

device {
# Describe the storage device itself
Name=bareos-sd
Media Type = File
# Path to device
Archive Device = /opt/backup
# Allow automatic volume partitioning
LabelMedia = yes
# For simultaneous access when performing multiple tasks at the same time
Random Access = yes
# Automatically mount device
Automatic Mount = yes
RemovableMedia=no
AlwaysOpen = no
}

messages {
Name = Standard
director=bareos-server=all
}

Bareos-fd.conf client configuration:

Director {
# Parameters for connecting director
Name = bareos-server
Password = "zcx@#$BGj"
TLS Enable=yes
TLS Require = yes
TLS Verify Peer = yes
TLS Allowed CN="bareos-server"
TLS CA Certificate File = /etc/bareos/ssl/ca-chain.cert.pem
TLS Certificate = /etc/bareos/ssl/bareos-server.cert.pem
TLS Key = /etc/bareos/ssl/bareos-server.nopass.key.pem
TLS DH File = /etc/bareos/ssl/dh1024.pem
}

FileDaemon {
# FileDaemon is a synonym for Client
Name=bareos-fd
Maximum Concurrent Jobs = 20
# Disables compatibility with Bacula. In this case, all #bareos features that are enabled by default are enabled.
Compatible = no
TLS Enable=yes
TLS Require = yes
TLS CA Certificate File = /etc/bareos/ssl/ca-chain.cert.pem
TLS Certificate = /etc/bareos/ssl/bareos-server.cert.pem
TLS Key = /etc/bareos/ssl/bareos-server.nopass.key.pem

}

messages {
Name = Standard
director=bareos-server=all
}

After all the basic settings, you need to restart the bareos services:

systemctl restart bareos-dir systemctl restart bareos-sd
systemctl restart bareos-fd

In case of errors, we look at the status with the command:

systemctl status bareos-dir.service -l

Let's move on to installing the bareos client plugin for Windows. Can be downloaded here.

Installing the plugin is just as easy. From the list of proposed components, we select only the two indicated in the screenshot: then we set a name for the client, and specify the parameters of an existing director: Server backup

Server backup

We write down the following data:

Client Name - win-fd
Director Name - bareos-server
Password - zcx@#$BGj
Networks Address-bareos-server

The entered settings can always be corrected, the default configuration file is located in "C:\Program Data\Bareos\bareos-fd.conf".

In the host's file, we also specify the IP for the BareOS server so that the name is resolved. From the server-side (bareos-server), the config for the client (win-fd) looks like this and is located along the path /etc/bareos/bareos-dir.d/win.conf:

client {
Name = win-fd
Address = win-fd
Password = "zcx@#$BGj"
TLS Enable=yes
TLS Require = yes
TLS CA Certificate File = /etc/bareos/ssl/ca-chain.cert.pem
TLS Certificate = /etc/bareos/ssl/bareos-server.cert.pem
TLS Key = /etc/bareos/ssl/bareos-server.nopass.key.pem
}

Pool {
Name=win-bareos-pool-Full
Auto Prune = yes
Label Format="bareos-client-Full-"
Pool Type = Backup
AutoPrune = yes
Recycle = yes
Volume Retention = 3 months
}

Pool {
Name=win-bareos-pool-Differential
Pool Type = Backup
AutoPrune = yes
Recycle = yes
Volume Retention = 11 days
Label Format="win-bareos-client-Differential-"
}

Pool {
Name=win-bareos-pool-incremental
Pool Type = Backup
AutoPrune = yes
Recycle = yes
Volume Retention = 10 days
Label Format="win-bareos-client-Incremental-"
}

FileSet {
Name=bareos-fileset-win
include {
File = "C:\\Users\\"
}
}

job {
Name = Job-win-Full
Type = Backup
Level = Incremental
Client=win-fd
FileSet=bareos-fileset-win
Schedule = "Monthly Cycle"
Storage=bareos-server-sd
Messages = standard
pool=win-bareos-pool-incremental
Full Backup Pool = win-bareos-pool-Full
Differential Backup Pool = win-bareos-pool-Differential
Incremental Backup Pool = bareos-pool-Incremental
}

job {
Name = Job-win-Full-restore
Type = Restore
Client=win-fd
FileSet="bareos-fileset-win"
Storage=bareos-server-sd
Pool=win-bareos-pool-Full
Messages = standard
Where = "C:/tmp"
}

From the FileSet directive, we see that for the Job-win-Full task we copy the user's folder C:\Users and in the Job-win-Full-restore task we restore it to the C:\tmp folder if necessary.

There is one more client left (bitrixvm), for which you need to copy the root directory and, in a separate task, copy the MySQL database.

Let's go to the bitrixvm machine and install the client: yum install -y bareos-client bareos-common

Let's go to the /etc/bareos directory

/bareos-dir.d
/bareos-fd.d
/bconsole.conf
/ssl
.rndpwd
tray-monitor.d

To configure the client, go to the directory /bareos-fd.d

/client
/director
/messages

By default, after installation, the configuration is scattered into the three directories shown above, so for further convenience, we will commit the partial configurations in the director and messages directories and make all the settings in /client/myself.conf

client {
Name = bitrixvm
Maximum Concurrent Jobs = 20
TLS Enable=yes
TLS Require = yes
TLS CA Certificate File = /etc/bareos/ssl/ca-chain.cert.pem
TLS Certificate = /etc/bareos/ssl/bitrixvm.cert.pem
TLS Key = /etc/bareos/ssl/bitrixvm.nopass.key.pem
compatible = no }

Director {
Name = bareos-server
Password = "zcx@#$BGj"
TLS Enable=yes
TLS Require = yes
TLS Verify Peer = yes
TLS Allowed CN="bareos-server"
TLS CA Certificate File = /etc/bareos/ssl/ca-chain.cert.pem
TLS Certificate = /etc/bareos/ssl/bitrixvm.cert.pem
TLS Key = /etc/bareos/ssl/bitrixvm.nopass.key.pem
TLS DH File = /etc/bareos/ssl/dh1024.pem
}

messages {
Name = Standard
Director = bareos-server = all, !skipped, !restored
Description = "Send relevant messages to the Director."
}

Enter the parameters and restart the service:

/etc/init.d/bareos-fd restart

We register in hosts the address for bareos-server

From the server side (bareos-server), the configuration for the client (bitrixvm) looks like this and is located in /etc/bareos/bareos-dir.d/bitrixvm.conf:

client {
Name = bitrixvm
Address = bitrixvm
Password = "zcx@#$BGj"
TLS Enable=yes
TLS Require = yes
TLS CA Certificate File = /etc/bareos/ssl/ca-chain.cert.pem
TLS Certificate = /etc/bareos/ssl/bareos-server.cert.pem
TLS Key = /etc/bareos/ssl/bareos-server.nopass.key.pem

}

Pool {
Name = bitrixvm-bareos-pool-Full
Label Format = "bitrixvm-bareos-client-Full-"
Pool Type = Backup
AutoPrune = yes
Recycle = yes
Volume Retention = 3 months
}

Pool {
Name = bitrixvm-bareos-pool-Differential
Pool Type = Backup
Label Format="bitrixvm-bareos-client-Differential-"
AutoPrune = yes
Recycle = yes
Select Job resource (1-6): = 11 days
}

Pool {
Name = bitrixvm-bareos-pool-incremental
Pool Type = Backup
Label Format = "bitrixvm-bareos-client-Incremental-"
AutoPrune = yes
Recycle = yes
Volume Retention = 10 days
}

job {
Name = Job-bitrixvm-mysql
Type = Backup
Level = Full
Client=bitrixvm
FileSet = bareos-fileset-bitrixvm-mysql
Schedule = "Monthly Cycle"
Storage=bareos-server-sd
Messages = standard
Pool = bitrixvm-bareos-pool-incremental
Full Backup Pool = bitrixvm-bareos-pool-Full
Differential Backup Pool = bitrixvm-bareos-pool-Differential
Incremental Backup Pool = bitrixvm-bareos-pool-Incremental

RunScript {
# Execute the script described in this section before doing the backup
RunsWhen = Before
# Run the script if the task (Job) is not completed successfully
RunsOnFailure = Yes
RunsOnClient = Yes
#
# The command itself for the script
Command = "sh -c 'mysqldump -uroot -ppassword --opt --all-databases > /tmp/dump.sql'"
}
}

job {
Name = Job-bitrixvm-Full
Type = Backup
Level = Full
Client=bitrixvm
FileSet = bareos-fileset-bitrixvm
Schedule = "Monthly Cycle"
Storage=bareos-server-sd
Messages = standard
Pool = bitrixvm-bareos-pool-incremental
Full Backup Pool = bitrixvm-bareos-pool-Full
Differential Backup Pool = bitrixvm-bareos-pool-Differential
Incremental Backup Pool = bitrixvm-bareos-pool-Incremental
}

FileSet {
Name = bareos-fileset-bitrixvm
include {
Options {
compression = GZIP
}
File="/"
}
}

FileSet {
Name = bareos-fileset-bitrixvm-mysql
include {
Options {
# Set the type of compression
compression = GZIP
signature = MD5
}
File="/tmp/dump.sql"
}
}

job {
Name = Job-bitrixvm-mysql-restore
Type = Restore
Client=bitrixvm
FileSet="bareos-fileset-bitrixvm-mysql"
Storage=bareos-server-sd
Pool = bitrixvm-bareos-pool-Full
Messages = standard
Where=/tmp
}

job {
Name = Job-bitrixvm-Full-restore
Type = Restore
Client=bitrixvm
FileSet="bareos-fileset-bitrixvm"
Storage=bareos-server-sd
Pool = bitrixvm-bareos-pool-Full
Messages = standard
Where=/tmp
}

In the RunScript section of the Command parameter, we run the mysqldump command, passing all the necessary parameters "mysqldump -uroot -ppassword -opt -all-databases > /tmp/dump.sql".

The saved dump.sql file will then be backed up as specified for the FileSet named "bareos-fileset-bitrixvm-mysql".

Bareos uses the TLS protocol to encrypt data transmission. For each client and the director, we must have a CA certificate, a certificate, and a key. We will use self-signed certificates, all this can be done through openssl.

Let's follow the path of the openssl configuration file /etc/pki/tls/openssl.cnf

Generating a CA certificate:

#openssl req -config openssl.cnf -new -x509 -extensions v3_ca -keyout private/myca.key -out certs/myca.crt

After entering the password and other data, we will receive two files:

/etc/pki/CA/private/myca.key /etc/pki/CA/certs/myca.crt

Let's correct/check the openssl.cnf settings file so that the paths to the certificates are correctly specified.

You also need to create the index.txt and serial files in the /etc/pki/CA folder:

touch /etc/pki/CA/index.txt

We immediately enter the value “01” into the serial file, the file will contain the following number for the following certificate:

echo '01' > /etc/pki/CA/serial

Content of openssl.cnf:

dir=/etc/pki/CA certs = $dir/certs crl_dir = $dir/crl database = $dir/index.txt #unique_subject = no new_certs_dir = $dir/newcerts certificate = $dir/certs/myca.crt serial = $dir/serial crlnumber = $dir/crlnumber crl = $dir/crl.pem private_key = $dir/private/myca.key RANDFILE = $dir/private/.rand x509_extensions = usr_cert
We generate a key for the server, you will need to enter a password.
openssl genrsa -aes256 -out bareos-server.key.pem 4096
We generate a certificate request. **Important**: at this point, when generating a certificate, you must correctly specify the Common Name (CN) so that it matches the machine name, otherwise errors will occur when trying to perform any task. In this example, CN = bareos-server
openssl req -config openssl.cnf -key bareos-server.key.pem -new -sha256 -out bareos-server.csr.pem
We sign the CSR through CA, and we get the certificate itself
openssl ca -config openssl.cnf -in bareos-server.csr.pem -out bareos-server.cert.pem
We remove the password for the key because bareos it needs passwordless
openssl rsa -in bareos-server.key.pem -out bareos-server.nopass.key.pem
CA-key and certificate are converted into one file with PEM extension
cat /etc/pki/CA/private/myca.key /etc/pki/CA/certs/myca.cert > ca-chain.cert.pem
Generating a DH Key
openssl dhparam -out dh1024.pem -5 1024
Copy the bareos-server.cert.pem bareos-server.nopass.key.pem ca-chain.cert.pem dh1024.pem certificates to the /etc/bareos/ssl folder, which you must first create and install the bareos group For each certificate, change the group to bareos
chgrp bareos*
Similar actions need to be done for each client (bitrixvm, win-fd):
openssl genrsa -aes256 -out bitrixvm.key.pem 4096 openssl req -config openssl.cnf -key bitrixvm.key.pem -new -sha256 -out bitrixvm.csr.pem openssl ca -config openssl.cnf -in bitrixvm.csr.pem -out bitrixvm.cert.pem openssl rsa -in bitrixvm.key.pem -out bitrixvm.nopass.key.pem
Using SCP, copy 4 files bitrixvm.cert.pem bitrixvm.nopass.key.pem ca-chain.cert.pem dh1024.pem to the bitrixvm remote machine in the /etc/bareos/ssl folder, which you must first create and set the bareos group as for folders, and for certificates. In the bitrixvm client configuration (/etc/bareos/bareos-fd.d/client/myself.conf) in the Director {} section, the client certificates, but not the director's certificates, must be specified. In the server-side configuration (/etc/bareos/bareos-dir.d/bitrixvm.conf), the director's certificates are specified in the Client {} section. After making configuration changes, restart the services. The creation of certificates for the win-fd machine is identical. You also need to register certificates for bconsole, a utility that allows you to manage the director in the /etc/bareos/bconsole.conf file:
Director { Name = bareos-server DIRport = 9101 address = bareos-server Password="mmm_777" TLS Enable=yes TLS Require = yes TLS Verify Peer = yes TLS Allowed CN="bareos-server" TLS CA Certificate File = /etc/bareos/ssl/ca-chain.cert.pem TLS Certificate = /etc/bareos/ssl/bareos-server.cert.pem TLS Key = /etc/bareos/ssl/bareos-server.nopass.key.pem }
The backup or restore procedure is as follows. Let's use the bconsole utility, as a greeting, we will see: * run - will show all possible Jobs:
*run A job name must be specified. The defined Job resources are: 1: Job-Full 2: Job-Full-restore 3: Job-bitrixvm-mysql 4: Job-bitrixvm-Full 5: Job-bitrixvm-mysql-restore 6: Job-bitrixvm-Full-restore Select Job resource (1-6): 3 Run backup job JobName: Job-bitrixvm-mysql Level: Full Client: bitrixvm Format: Native FileSet: bareos-fileset-bitrixvm-mysql Pool: bitrixvm-bareos-pool-Full (From Job FullPool override) Storage: bareos-server-sd (From Job resource) When: 2016-10-16 11:05:16 Priority: 10 OK to run? (yes/mod/no): # The task that is left to be executed receives the JobId job queued. JobId=75
The result of the command execution can be viewed either through the message command and in response we get something like this:
16-Oct 11:05 bareos-server-sd JobId 75: Volume "bitrixvm-bareos-client-Full-0011" previously written, moving to end of data. 16-Oct 11:05 bareos-server-sd JobId 75: Ready to append to end of Volume "bitrixvm-bareos-client-Full-0011" size=2086097429 16-Oct 11:05 bareos-server-sd JobId 75: Elapsed time=00:00:01, Transfer rate=319.2 K Bytes/second 16-Oct 11:05 bareos-server JobId 75: Bareos bareos-server 15.2.2 (16Nov15): Build OS: x86_64-redhat-linux-gnu redhat CentOS Linux release 7.0.1406 (Core) JobId: 75 Job: Job-bitrixvm-mysql.2016-10-16_11.05.38_07 Backup Level: Full Client: "bitrixvm" 16.3.1 (01Jul16) x86_64-redhat-linux-gnu,redhat,CentOS release 6.6 (Final),CentOS_6,x86_64 FileSet: "bareos-fileset-bitrixvm-mysql" 2016-10-14 04:57:40 Pool: "bitrixvm-bareos-pool-Full" (From Job FullPool override) Catalog: "bareos-server" (From Client resource) Storage: "bareos-server-sd" (From Job resource) Scheduled time: 16-Oct-2016 11:05:16 Start time: 16-Oct-2016 11:05:42 End time: 16-Oct-2016 11:05:42 Elapsed time: 0 secs Priority: 10 FD Files Written: 1 SD Files Written: 1 FD Bytes Written: 319,187 (319.1 KB) SD Bytes Written: 319,285 (319.2 KB) Rate: 0.0 KB/s Software Compression: 71.0% (gzip) VSS: no Encryption: no Accurate: no Volume name(s): bitrixvm-bareos-client-Full-0011 Volume Session Id: 3 Volume Session Time: 1476554202 Last Volume Bytes: 2,086,417,588 (2.086 GB) Non-fatal FD errors: 0 SD Errors: 0 FD termination status: OK SD termination status: OK Termination: Backup OK
Or via the status dir command
Terminated jobs: JobId Level Files Bytes Status Finished Name ================================================= ================== 72 Full 0 0 Error 15-Oct-16 13:39 Job-bitrixvm-Full 73 Full 49,442 515.4 M OK 15-Oct-16 14:03 Job-bitrixvm-Full 74 Incr 20 36.81 K OK 16-Oct-16 02:01 Job-Full 75 Full 1 319.1 K OK 16-Oct-16 11:05 Job-bitrixvm-mysql
Here in the column "**Status**", you can view the status of the backup. Job number 75 was successful. Restoration occurs with the restore command
*restore
After that, a list of all possible options will be presented:
To select the JobIds, you have the following choices: 1: List the last 20 Jobs run 2: List Jobs where a given File is saved 3: Enter a list of comma-separated JobIds to select 4: Enter SQL list command 5: Select the most recent backup for a client 6: Select backup for a client before a specified time 7: Enter a list of files to restore 8: Enter a list of files to restore before a specified time 9: Find the JobIds of the most recent backup for a client 10: Find the JobIds for a backup for a client before a specified time 11: Enter a list of directories to restore for found JobIds 12: Select full restore to a specified Job date 13: Cancel
Custom Server

Custom server

Create your own custom dedicated server

See configurator

Let's show a list of the last 20 tasks: Server backup

Press 3 and specify the JobID number, for example, 75. After that, we automatically get into the console to select the files we want to restore:

cwd is: /
$

A list of all available commands can be viewed through the help command. We check which files are available in this backup, and mark the necessary files with the mark command by specifying files or by *, thus selecting all. Upon completion, we execute the done command, after which dialogue with the system will begin.

$ls
tmp/
$ cd tmp/
cwd is: /tmp/
$ls
dump.sql
$ mark*
1 file marked.
$done

The job will require the following Volume(s) Storage(s) SD Device(s) ================================================= =========================

bitrixvm-bareos-client-Full-0011 bareos-server-sd bareos-sd

Volumes marked with "*" are online.

1 file was selected to be restored.

Select the recovery task we need (point 2)

The defined Restore Job resources are: 1: Job-Full-restore 2: Job-bitrixvm-mysql-restore 3: Job-bitrixvm-Full-restore Select Restore Job (1-3): 2

Specify the client for which we perform the recovery (2)

Defined Clients: 1: bareos-fd 2: bitrixvm 3: win-fd Select the Client (1-3): 2

Using Catalog "bareos-server" Run Restore job JobName: Job-bitrixvm-mysql-restore Bootstrap: /var/lib/bareos/bareos-server.restore.1.bsr Where: /tmp Replace: Always FileSet: bareos-fileset-bitrixvm-mysql Backup Client: bitrixvm Restore Client: bitrixvm Format: Native Storage: bareos-server-sd When: 2016-10-16 11:26:54 Catalog: bareos-server Priority: 10 Plugin Options: None OK to run? (yes/mod/no): yes

We confirm the task through yes, with the mod command you can edit the recovery options before starting, including changing the recovery directory. Next, the task is assigned a JobId.

job queued. JobId=76

With the status dir command, you can see the recovery status. As you can see, everything went well. After that, you can go to the remote client, and in the /tmp folder we will find the restored dump.sql file.

76 1 1.100 M OK 16-Oct-16 11:27 Job-bitrixvm-mysql-restore

In conclusion, we can say that Bareos is actively developing, has in its arsenal a lot of useful features that are beyond the scope of this article, and the presence of plugins that can expand the functionality also make a positive impression (MS SQL backup, plugins for storing data on Ceph, Gluster, LDAP backup).

Was this article helpful?

Tags:

#server

Did you like the article?

Cookie consent

By clicking «I agree», you consent to our website's use of cookies to give you the most relevant experience by remembering your preferences and repeat visits. However, you may visit «Manage сookies» to provide controlled consent. Learn more

Cookies settings

functional

Necessary cookies are crucial for the basic functions of the website and the website will not work in its intended way without them.

Analytics

Analytical cookies are used to understand how visitors interact with the website.

Advertisement

Advertisement cookies are used to provide visitors with relevant ads and marketing campaigns.