Expanding an LVM disk inside OS Linux (using Debian as an example)

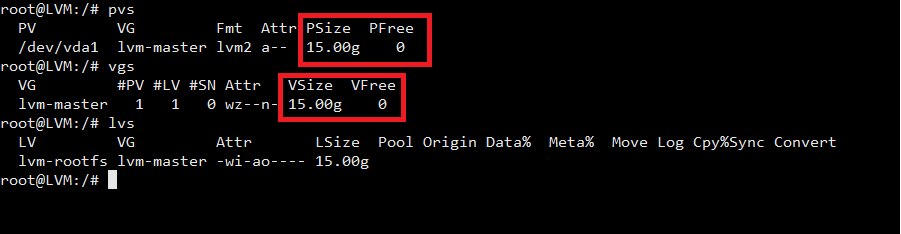
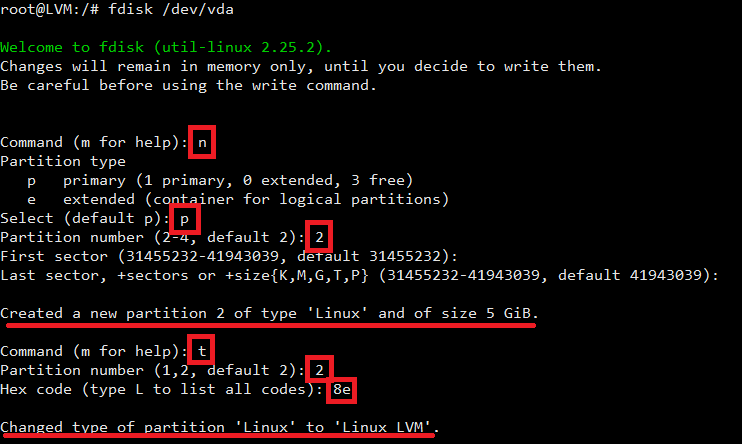
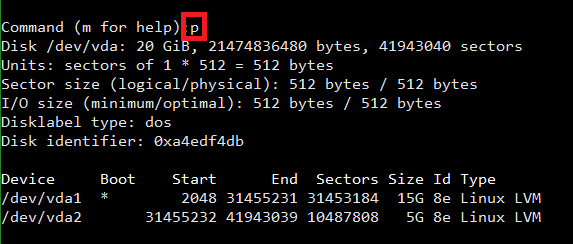
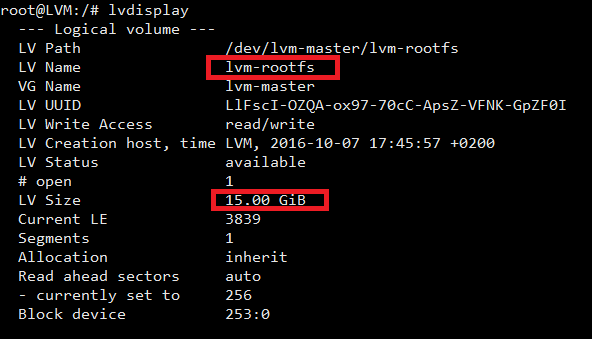
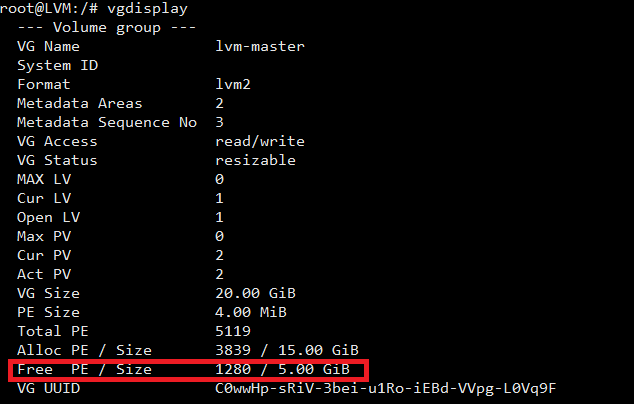
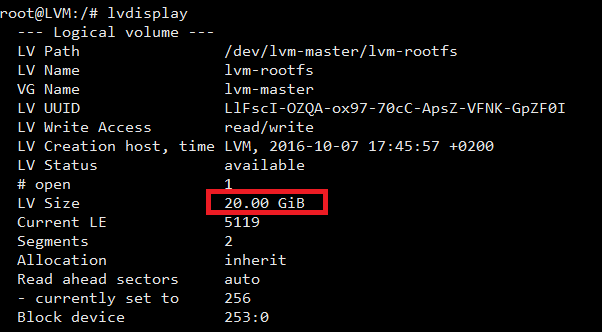
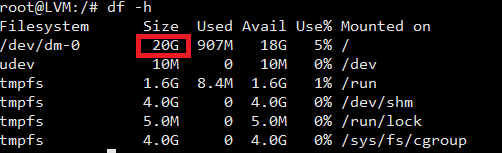
Initial data: OS: Debian Linux 8. The original LVM size is 15 GB. Goal: Expand LVM to 20 GB, for the entire available hard disk space.

Important! Before making changes, be sure to back up (back up) all server data. Any manipulations with partitions carry the risk of data loss.

There is another way to expand a disk in Linux (Debian, CentOS, Ubuntu).

Step one

At this stage, we have one PV (physical volume), one VG (volume group), and one LV (logical volume).

# pvs
# vgs
# lvs

Disk expansion

As you can see from the screenshot, we don't have space available in the physical volume and volume group to expand our logical volume. To expand the logical volume, we need to create a new physical volume. Then expand our logical volume by adding a new physical volume to it.

To create a new partition on the hard disk, we will use the fdisk program:

# fdisk /dev/vda

n – to create a new partition on the disk; p – to assign primary to the new partition.

Specify the number that this section will wear. The First sector and the Last sector are specified by default. After that, we will receive a notification that a 5 GB Linux partition has been created.

Now you need to change the partition type from Linux to Linux LVM: t – to change the type of the created partition. We indicate the number of our section: 8e is the hex code for the LVM type.

As a result of this operation, we will receive a message that the partition has been changed from Linux to Linux LVM.

Disk expansion

Now let's make sure everything is fine by pressing p: p – to list all volumes on our disk

Disk expansion

Then w, to write the changes to disk and exit the fdisk program.

After exiting the program, we get a message to apply the changes, we need to reboot (preferably) or run the partprobe command.

# reboot

Disk expansion

After we have successfully created a partition, we need to create a new physical volume based on this partition:

# pvcreate /dev/vda2

The command will return that the physical volume was successfully created:

Disk expansion

Dedicated Server

Dedicated server

Check out SIM-Networks’ powerful pre-made server configurations

See packages

Step two

The next step is to expand our volume group by adding the created physical volume to it.

# vgextend lvm-master /dev/vda2

Now let's check how much free space is available in our VG at the moment:

# vgs

Disk expansion

Using the lvdisplay command, we can see a list of all logical volumes that are currently available:

# lvdisplay

Disk expansion

One is available to us, it is called lvm-rootfs. This logical volume contains our root partition ( / ).

Now we will expand our LV lvm-rootfs to the 5 GB available to us (from 15GB to 20GB). The vgdisplay command will show free PE (Physical Extend):

# vgdisplay

Disk expansion

It is for this number of PEs that we will expand our LV lvm-rootfs:

# lvextend -l +1280 /dev/lvm-master/lvm-rootfs

Disk expansion

After expanding LV, you need to expand the file system to the entire available volume:

# resize2fs /dev/lvm-master/lvm-rootfs

Disk expansion

Now let's look at the new size of our LV:

# lvdisplay

Disk expansion

As you can see, the size has changed from 15 to 20 GB:

Disk expansion

Was this article helpful?

Did you like the article?

Cookie consent

By clicking «I agree», you consent to our website's use of cookies to give you the most relevant experience by remembering your preferences and repeat visits. However, you may visit «Manage сookies» to provide controlled consent. Learn more

Cookies settings

functional

Necessary cookies are crucial for the basic functions of the website and the website will not work in its intended way without them.

Analytics

Analytical cookies are used to understand how visitors interact with the website.

Advertisement

Advertisement cookies are used to provide visitors with relevant ads and marketing campaigns.